One of the things I enjoy most about being a photographer is the opportunity to share the knowledge and experience I’ve gained during my 40+-year career looking through the lens. I consider teaching both a privilege and a responsibility, and I do a lot of it.
Something I get asked to address in nearly all of my workshops, both private and small-group, is how to see like a photographer — how to visualize, how to make that leap from snapshot to expressive photograph, how to create an image that’s “Ansel-worthy.”
What does it mean to see like a photographer?
For me, to see like a photographer means that I am constantly looking at things for their photographic potential and visualizing what a finished image might look like — whether as a literal expression of what’s in front of me, or as an expressive interpretation of how I feel, what I think, or what a particular moment or place means to me.
Here’s an example of how and what I see:
A couple of months ago, my wife, Julie, and I were on our way into Yosemite Valley for an upcoming workshop and stopped at Inspiration Point to soak up the grand vista and stretch our legs.
I made a few images with my Canon digital, while Julie snapped away with her iPhone. When we got back to the car, she asked me what I saw.
Without even thinking, I told her that I’d noticed the many dead trees, the incredible water tumbling over Bridalveil Fall and the relationship between the reddishness of the dead trees to the green of the live trees. While I didn’t feel there was enough potential drama to get the big camera out, if I did work the scene, I would likely use an orange-to-red filter to lighten the rusty trees, and darken the green forest to emphasize the whiteness of the fall.
A few days after we returned home, I was chatting with Julie and looking out our window. I caught myself unconsciously moving my head a few inches to one side and back, playing with how the clumps of trees outside seemed more (or less) spatially organized relative to the border formed by the window frame with my head in one position or the other. (And I did this without missing a beat in our conversation!)
I just can’t help it…I’m ALWAYS looking, always seeing, always evaluating, even when I’m not “working.”
Ansel Adams called this process visualization. His ability to consistently look, see, evaluate, visualize and express was one of the main reasons he became the photographer he was. It helped him create those jaw-dropping images that beg the question…”how’d he do that?”
While I was working with him, Ansel Adams helped me see like a photographer.
Conceptually, seeing photographically isn’t that hard to understand, or at least I don’t think it is. But teaching it on a practical and “doable” level has its challenges. How we react to a scene, an object, or an element of nature is something unique and so highly personal.
Looking at Ansel’s own words on visualization, however, I think it is possible to learn to see photographically. “We must examine and explore what lies before our eyes for its significance, substance, shape, texture, and the relationships of tonal values. We can teach our eyes to become more perceptive.”
In more practical terms, here are some of the things I suggest to workshop students as they practice how to see like a photographer:
LOOK…in front of you, behind you, above, below, near, far. Wander off the path in all directions. Take the time to really see what’s there. During an “Expressive Photography” workshop I did for Carmel Visual Arts last year, we took the old coast road off Highway 1 as a field session. Everyone went at their own pace, stopping to photograph what interested or moved them.
When we compared notes and images the next day, one of the students had made an absolutely stunning abstract image of some colorful mushrooms she found growing under a log. Almost to a person, everyone in our group wished they had seen those mushrooms and photographed them. The person who got the image was the one who took the time to wander and LOOK.
DON’T JUST LOOK WITH YOUR EYES. Try and engage your other senses and take a moment (or five!) to think about what attracts you to the scene or the object in the first place. What made you want to pick up your camera? Focus in on that as you start to evaluate what you’re going to photograph and how.
SLOW DOWN, THINK, EXPERIMENT. Once you’ve isolated what you’d like to photograph, don’t be in a rush. Slow down and experiment. Is some element in the subject made clearer by moving the lens up, down, left or right—even if just an inch or two? Is the image stronger in black-and-white or color? Will a filter enhance some of the tonal values and help you better capture the mood or the feeling of the place? Will the image suit your personal interpretation or expression of the scene, if, for example, you darken the sky either in the darkroom or in post-processing?
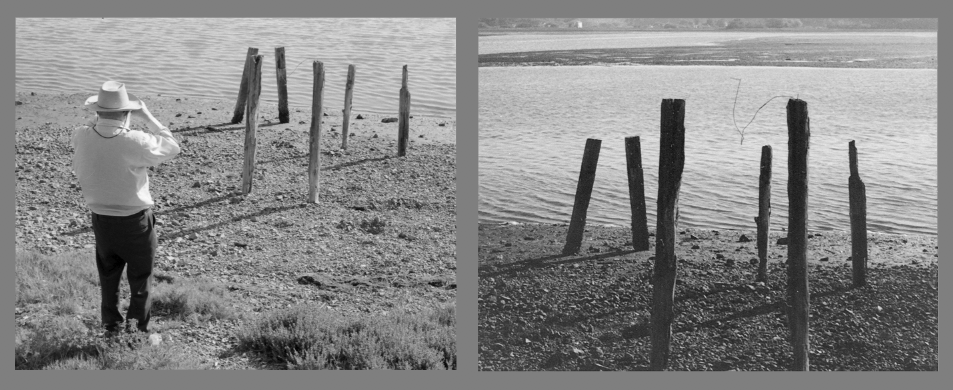
ESCHEW SURPLUSSAGE. Mark Twain used these words in his essay, “Fenimore Cooper’s Literary Offenses”. It’s good advice, especially when it comes to photography. If it’s not needed, don’t include it. I frame a scene with my hands or use a cropping card to experiment with what elements I might want to include or exclude from a particular scene.

Ansel Adams using his hands to frame an image: Old Pilings, Bolinas Lagoon, California 1976
These suggestions may seem pretty basic, and certainly not the special “Ansel Adams button” that will magically transform your efforts into a masterpiece worthy of Ansel’s signature. But in my experience, it’s often the small things that really matter and that make the most difference in successfully “seeing” photographically and expressing your personal vision. Give these a try!
Are you struggling to see like a photographer yourself. I’m always available by email, no matter where in the world I happen to be. I’d love to hear from you. And if you’d like some one-on-one coaching without ever leaving the comfort of your own home, check out my Virtual Photography Coaching.
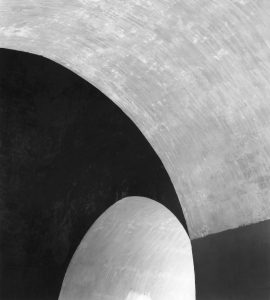
Arches, Ming Tombs, Beijing, China 1982
I like to use this image as an example of just how important tiny adjustments to lens placement can be. My subject was a square tower with thick walls and arched opening in each of the 4 walls. Walking by the structure, I noticed that an interesting abstraction was formed when looking through one arch across to another. I set up my 4×5 camera and found a particular spot where a painted demarcation area on the foreground arch exactly met the curve of an opposite arch. I chose a lens to give the cropping I wanted, micro-adjusted the lens position and released the shutter. A half-inch difference in lens position would have spoiled the effect.
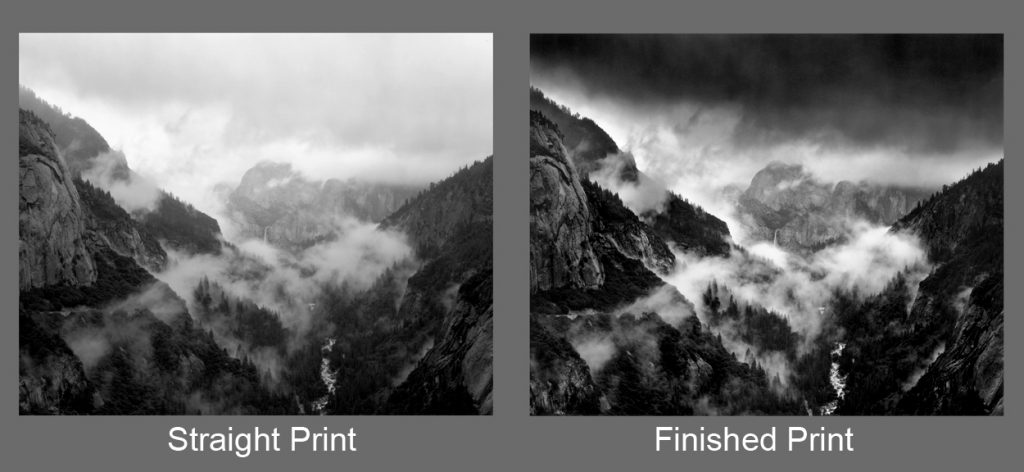
My Bridalveil Fall in Storm, Yosemite, 1974
Returning to Yosemite Valley after a fruitless, rainy, field session in Yosemite’s High Country during a July, 1974 Ansel Adams workshop, a couple of other soggy workshop assistants and I popped out of the Crane Flat tunnel to come face-to-face with this marvelous vista of clouds, mountains, waterfall and river. Amazingly, there were almost no other cars stopped at the handful of parking spots, so I pulled over and we all scrambled for our cameras.
I first tried a 150mm lens on my 4×5 camera, but it revealed only a nice scene with no clear “look at this” focus. I switched to my 203mm and everything came together. I expanded the cloud contrast with a yellow (#12) filter, but the scene was otherwise pretty monochromatic. I had an early spotmeter – a 1° SEI – and based my exposure to give me good density in the darkest trees.
Later, when I made a quick contact print, I could see I had full detail in both shadows and highlights—a perfect Zone System negative–but the literal rendition of the scene was a complete bore. This is where visualization came into play. The way I visualized the scene had nothing to do with the tonalities that were the reality of what was in front of my lens.
The tonal information recorded in the negative gave me all the substance I needed to bring my interpretation of the scene to life. I expanded the contrast in the lower clouds and forest and river, and darkened the cloudy sky to give the scene the drama I felt at the time of exposure.
By the way, this was just part of a REALLY good week for me. Ansel had just hired me as full-time assistant in Carmel a few days earlier and over the next several years, he gave me the chance to fine tune my ability to see like a photographer. I learned from the best.
Alan
_______________________________________________________________________________________
Do you love taking photographs?
Do you dream of being a better photographer?
Do you have questions about exposure, visualization, Photoshop, or Lightroom?
If your answer is YES, then you’re ready for a totally new way
to learn how to express your photographic vision…
Alan Ross’ Live Virtual Photography Coaching
For People Who Are Passionate About Photography
“Over the years hundreds of people from all over the world have asked me for personal help.
There was just no way I could do it…until now. Today, I’m thrilled to be able to coach
budding photographers from my own studio using the internet!” – Alan Ross
Read student testimonials and find out how to sign up here.
___________________________________________________________________________________________
Upcoming photo expeditions and workshops:


Seth Addy
Okafor anita
Bob Decker